As with earlier versions of the Windows operating system, an Upgrade installation requires that you have a previous version to serve as a “qualifying product.” However, this time around you will not be able to use the Upgrade from Windows 95. Windows XP requires Windows 98 or newer to qualify.
NOTE: By design, Win95 should not work as a qualifying product. However, there is a bug in the Setup program on Windows XP CDs (both Home Edition and Professional). Apparently, Microsoft will not be fixing this bug. As a result, though you will not be able to perform an upgrade installation from a Win95 install, the following operating system CDs will suffice as “Qualifying Media” for a clean install:
- Windows NT Workstation, Versions 3.51 & 4.0
- Windows 2000 Professional
- Windows 95
- Windows 98 (Original & Second Edition)
- Windows Millennium Edition
Also, the old question remains of whether an OEM CD or “Restore Disk” supplied by your computer manufacturer will “qualify.” The answer is that not all will work for this purpose, mostly because the Windows CAB files are not in evidence. Check with your computer manufacturer to confirm that your copy qualifies, or buy your Upgrade copy directly from them. Presently, the only company that I have confirmed all their OEM CD’s will “qualify” is Dell. I talked to a Dell Representative during the XP Launch in New York City on the trade show floor who confirmed this and stated that they understood the importance of keeping it that way.
So what do you do if your OEM CD or Restore disk does not work as qualifying media? One neat new feature of XP allows one to get around this problem. First, start the XP clean install from within an existing qualified install rather then from the XP CD or from a DOS prompt. When you see the screen that ask what type of install to do, change “Upgrade (Recommended)” to “New install.” You can then select the existing partition, format it, and do a Clean Install, never having to insert your qualifying product CD.
As in the past, Original Equipment Manufacturer (OEM) copies, which can be purchased with a qualifying piece of hardware, cannot be used to Upgrade. They will allow only a clean install, and all support is the responsibility of the seller. Microsoft will provide no support for OEM copies of Windows. (However, you can still get free support even for OEM copies, usually of a very high quality, on the peer-support newsgroups that Microsoft sponsors. - Ed.) Also, there are some important changes regarding OEM copies, which will make them a more attractive alternative for many people: See OEM CD’s & Microsoft Licensing: What Has Changed? below.
You first have to decide of whether to purchase Windows XP Home or Professional. You will find several links to articles comparing the two Win XP Versions here.
As with earlier versions of Windows, you will have the option either to clean install or to upgrade. So, what is the difference?
With a clean install you start completely over from scratch, right?
Well, that used to be true; but with Windows XP, you have the option (from the CD’s welcome screen) to select “Transfer Files and Settings.” (See a screen shot here and read about it in my File & Settings Transfer Wizard article.) This utility allows you to export your personal settings, such as network settings; Dial-Up Networking; email information including accounts, folders, and filters; and registered file types. Then you can import them back into Windows after your clean install of XP. In other words, “Transfer Files and Settings” blurs the meaning of starting over with a clean install, when all that information can be gleaned and saved from your old install before you format. It does not bring the actual applications — those would need to be reinstalled, which that is why you should consider the upgrade route instead.
An upgrade is by far the simplest approach, and requires the least from the user. You just install Windows XP over the old Windows install, and it keeps your settings, files, and all your applications as well. If you have “tweaked” your system heavily, installing then uninstalling many programs from the web and, in general, played with the system a lot, you are a candidate for a clean install; but if you are an average user, you should take Microsoft’s advice during the initial install and note the word “Recommended” next to the Upgrade option in the Install Type box.
And the best thing about an upgrade is that it’s easy, and doesn’t require you to reinstall all your existing applications. If it doesn’t meet your expectations, you can always fall back and do a clean install with your Upgrade CD by inserting your Windows 98 or Millennium CD in your drive when asked proof of ownership. You really can’t lose.
To get a good result from an upgrade you will need to do a little homework and, more importantly, a little house cleaning. This gives you the best chance of being happy with your upgrade installation of Windows XP.
NOTES ON SPECIFIC SOFTWARE
To be safe, if you are not sure about your version of these programs (or, for that matter, the XP-readiness of any other software you have), remove the program via Control Panel | Add/Remove Programs, then try reinstalling after the Win XP upgrade. As a general rule it is best to uninstall any firewall, antivirus, CD burning, NAT, or proxy server programs prior to the upgrade.
- For ZoneAlarm or ZoneAlarm Pro to survive an upgrade with no problems, they must be version 2.5.357 or later.
- Norton AntiVirus must be version 2002. (NAV 2001 will work with XP, but make sure it has the XP update patches from Symantec.) I am most with comfortable removing this utility completely via the Add/Remove Programs applet in Control Panel, then reinstalling it after the upgrade.
- Norton GoBack also has had some issue with upgrades, and Symantec addresses the issues on their web site. Remove GoBack with the Add/Remove Programs applet, then reinstall it after the upgrade.
- EasyCD version 4.03 will make the trip, but you should install the version 4.05 upgrade immediately after installing Windows XP.
- MusicMatch Jukebox also seems to survive an upgrade, but you should reinstall just after the upgrade.
- If you have installed the Target Context PowerToy to your system, remove it prior to the install via the Control Panel’s Add/Remove Programs applet; see also the PowerToys FAQ on this site for a discussion of the PowerToys that will still work under Windows XP.
- If you own a Hewlett Packard All in One Printer, remove your print driver before the upgrade. This step may be crucial to your being able to use your printer. For any HP printer, see this page on their web site for more information.
Release Notes for Windows XP Setup Contained in the PRO.TXT File
Release Notes for Windows XP Setup Contained in the HOME.TXT File
NOTE: Variations pertaining to Windows Millennium will be noted as we go.
1. In the past, this is where I would have stated categorically that you should not upgrade on top of an installed operating system with existing problems. That is probably still good advice, but, since Win XP is based on an entirely different kernel, it replaces virtually all of any Win 9x install anyway. This means it is more likely to fix a flaky installation. No guarantee, just more likely.
2. Since I have been one of those involved with keeping the old MS Fax (originally from Win95) alive and working even on Windows Millennium, I should say that the days of MS Fax are done. Do not even think about trying to make it work with XP. That dog won’t hunt. <bg> By all means try the new Fax Service for XP explained here: How to Enable & Configure the Fax Service
3. This is also a good time to remove, using Control Panel | Add/Remove Programs, any programs that you do not use or that have become antiquated. Get rid of any unnecessary programs now.
4. Check the Web site for your computer manufacturer to see if there is an update for your BIOS. A BIOS update may be a good idea if your BIOS is more then two years old. If you have not flashed a BIOS before, follow the update instructions from your computer or motherboard manufacturer exactly. This update can do serious damage to your computer if not done correctly. Better, if it is your first time, to take it to a technician or have a competent friend come over and help. If in doubt, do not.
5. Shut down the screen saver: Right-click on an empty spot on the desktop, and select “Properties,” then the “Screen Saver” tab. Select “None” for your screen saver. While you are at the Screen Saver tab, check to be sure that Power Management settings are all set to “Never.”
6. Manually delete the Temp files. Reboot first, just to make sure you do not interrupt something in process. Include:
Alternatively, you can use the Disk Cleanup Tool. Open My Computer, indicate the drive, right-click, and select Properties.
7. Next, I run Scandisk, EasyCleaner, RegClean 4.1a, and Windows Disk Defragmenter to make sure there are no problems. (You can substitute your own favorite utilities.) Do this before the upgrade then update EasyCleaner to version 2.0, since older versions of EasyCleaner will remove Registry keys required for Windows’ Help system to run, effectively breaking it. Also, Symantec states that you should upgrade to their newest versions of their products for XP. In other words, do not use this type of utility after the XP Upgrade unless they are updated to versions specifically created for Windows XP.
8. In Win98, if you are familiar with ScanReg, run SCANREG /OPT /FIX from a real-mode DOS prompt. (In other words, reboot to MS-DOS, rather than just using a DOS window.) Run this from one to three times in succession. This will repair and compact your Registry, always a good idea and particularly well-advised just before upgrading. Windows Millennium will not reboot to real-mode DOS, but SCANREG /OPT /FIX runs just fine, and faster, from the Start | Run box. (During the process, in ME, your system will reboot to finish the job.)
9. For Norton Antivirus 2001, you have to go to “Options” | “Auto-Protect,” uncheck “Load Auto-Protect at startup,” “OK” out, and answer Yes to “Do you want to unload now” to keep it from popping up during installation. You can restart AutoProtect after the upgrade, but go to Norton AntiVirus now and uncheck “Scan System files at Startup” under “Startup Scan.” It should no longer run.
Norton Antivirus 2002 is more complicated. I would uncheck all the following:
| Under this heading | Uncheck the following |
| Auto Protect | Enable Auto Protect; Start Auto Protect When Windows Starts Up |
| Script Blocking | Enable Script Blocking |
| Live Update | Enable Automatic Live Update |
| Inoculation | Inoculate Boot Record |
| Miscellaneous | Alert me on start up if my virus protection is out of date |
The above is probably overkill, but it won’t hurt to be ahead of the game. Personally, I uninstall my antivirus software, then reinstall it after the upgrade. This is the best method to make sure your antivirus software works correctly.
Also, check your BIOS to make sure you do not have BIOS antivirus protection enabled. Other antivirus programs may have similar features that need to be disabled. See your documentation for instructions.
10. Make sure you disable any firewall you have install so that it does not run at startup. (With ZoneAlarm, bring up the program on your screen and select the “Configure” tab. Uncheck “Load ZoneAlarm at startup” box.) As mentioned previously, the best method is to remove your firewall, then reinstall it after the upgrade.
11. Launch MSCONFIG. On its General tab, uncheck the “Process Startup Group” box. This will keep stray applications from running and interfering with the upgrade. (Remember to go back and recheck this box after you are finished with the upgrade.) Sometimes, Windows Setup will say mysteriously that it has still found a driver running that will get in its way. Don’t worry, let it reboot to inhibit whatever it has found, then run Setup again and it should upgrade fine.
12. OK, you are nearly done. But now you will want to set yourself up to make a clean install as easy as possible, if this is necessary later. To do this, run Transfer Files and Settings from the Windows XP CD-ROM. (See below, The Windows XP CD.) By running this wizard and safely storing your settings, accounts, folders and created files on another drive, CD-RW, or other storage medium, you make a clean install less of a headache. By importing this saved information, many hours of tweaking the newly installed operating system will be saved.
If you’ve followed all the advice above, your system will be squeaky-clean. It is ready for the Windows XP Upgrade.
1. Remember to go to the Windows Update site soon after the install and make any updates that are available.
2. System Restore is found at Programs | Accessories | System Tools | System Restore. A new Restore Point is automatically created on the install partition, if you have room, upon completion of the Win XP upgrade. Remember this if things deteriorate soon after the upgrade (as you proceed to add programs, make configuration changes, etc.).
3. Remember to turn back on
4. After the install you may find the following MSKB article of use: How to Troubleshoot Program Compatibility Issues in Windows XP.
1. Windows XP will ask you early in the install whether you want to connect to the web to update the install routine. This is a powerful tool and will help make the installation go well. Only the updates to the tool are downloaded during the install, so, by all means, let it update. For further information on this feature, see Description of the Dynamic Update Feature in Windows XP Setup.
2. A few steps later, the Setup program will suggest that you look at a report from the Upgrade Advisor. This is one of the tools that get updated during the update just mentioned, and is the same tool you can download from the MS Web site (discussed above; see also the link at the left of your screen). Leave the default and let Setup identify possible problems. This report will identify both hardware and software compatibility issues. Depending on the seriousness, you may want to cancel the install and do one of the following:
There will be fewer issues as time goes on. So, by all means, allow the Upgrade Advisor to upgrade itself from the Web to benefit from late additions to this wizard.
The Windows XP CD-ROM has some differences from past Windows versions. First, the CD is bootable. So, if your system supports and is set to look for a bootable CD, you will not need an Emergency Boot Disk for any type of install of XP. The CD-ROM also has several valuable utilities, and provides access to some great information.
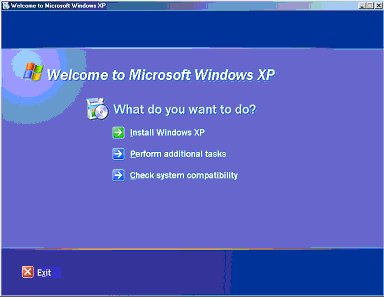
Go ahead and put it in your Windows XP CD. The first screen will look like this:
Select “Perform Additional Tasks” on this screen and you will see the following screen:
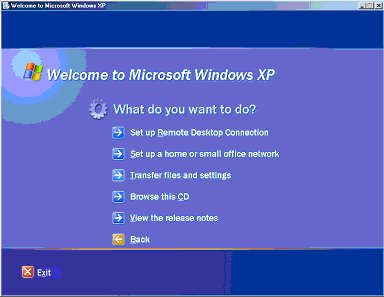
These are for after the XP install and are pretty self-explanatory. (They are also available from within XP at Start | Settings | Network Connections.)
This utility allows you to transfer your personal settings such as Network settings, Dial Up Network, E-mail information including accounts, folders and filters. It catches your registered data file types and can bring those data files across to a new install of XP. For additional information on this remarkable tool, see my article File & Settings Transfer Wizard.
This takes you to Windows Explorer to take a look at the actual files on the CD-ROM.
This accesses the RELNOTES.HTM file on the CD. Lots of information here and it explains the above utilities. Spend some time here as it is worth you time.
An OEM copy (according to the signed agreement between the seller and Microsoft) is to be sold only with a new computer or a “qualifying” piece of hardware. That used to be pretty much restricted to a hard drive, CPU, or motherboard. The rules for what “qualifies” for an OEM sale recently were loosened considerably. Some have read them even to encompass something as minor as a power cord.
Basically, OEM copies are supposed to be sold with a fully-assembled computer system or a non-peripheral hardware component. A fully-assembled computer system normally consists of at least a central processing unit, motherboard, hard drive, power supply, and a case. A non-peripheral hardware component is any component that is essential to running a computer system, such as memory, internal drives, mouse, or power supply. According to an OEM System Builder with whom I spoke recently, it is pretty much up to the OEM supplier to determine what qualifies — but a power cord probably shouldn’t make the grade.
If you qualify an OEM copy, this brings down the cost of Win XP considerably in comparison to a retail “Full” version — particularly with the XP Professional version. The following chart tells the story.
| Win XP Edition | Street Price | What It Does | |
| Win XP Home Edition | Retail “Full” | $199 | Clean Install & Upgrade |
| Retail “Upgrade” | $99 | Clean Install & Upgrade; Requires you to have Qualifying Previous Version |
|
| OEM “Full” | $90-$95 | Clean Install only; No Microsoft support |
|
| Win XP Professional | Retail “Full” | $299 | Clean Install & Upgrade |
| Retail “Upgrade” | $199 | Clean Install & Upgrade; Requires you to have Qualifying Previous Version |
|
| OEM “Full” | $140-$145 | Clean Install only; No Microsoft Support |
|
Microsoft recently changed their policies on additional licenses. Previously they had offered only 5% to 10% discounts on additional licenses. Now you can get an across-the-board 15% discount. The discounts are discussed on the Windows XP Home Edition retail page and the Windows XP Professional Edition retail page. Keep in mind that these “additional licenses” can be used only with an existing CD copy of the respective Windows versions, and will not work for systems where Windows XP was preloaded on the system and did not include a CD copy. Make sure that you read the “how to qualify for and order your new Product Key” link on the above web sites.
NOTE: This is a very recent change in Microsoft’s pricing policy. There is no 5-copy minimum purchase required as with past Volume Licensing. You can buy only one additional license, or as many as three additional licenses per original copy for which you have a license. Windows Product Activation (WPA) is enforced for these one-at-a-time supplemental licenses.
Microsoft’s recommended pricing, which may differ from actual retail pricing, is summarized in the following table:
| Win XP Edition | Street Price | What It Does | |
| Win XP Home Edition | Retail “Full” | $199 | Clean Install & Upgrade |
| Additional Full License | $170 | ||
| Upgrade CD | $99 | Clean Install & Upgrade; Requires you to have Qualifying Previous Version |
|
| Additional Upgrade License | $85 | ||
| Win XP Professional | Retail “Full” | $299 | Clean Install & Upgrade |
| Additional Full License | $255 | ||
| Upgrade CD | $199 | Clean Install & Upgrade; Requires you to have Qualifying Previous Version |
|
| Additional Upgrade License | $170 | ||
OEM copies still deserve consideration, however. In the past, OEM copies have been looked down on by many knowledgeable users. Yes, they now are considerably cheaper. But they only are supported by the seller. No telephone support is available from Microsoft. And they only clean install on a blank drive or partition. What surely will draw more attention to them is the advent of the “Transfer Files and Setting” utility discussed above, which gives a clean install more of the advantages of an upgrade. Now you can buy an OEM copy, use the “Transfer Files and Settings” wizard to capture your current system information, and seriously reduce the tweaking and setup normally required by a clean install. You will still have to reinstall all your applications, but that normally is less then half the work.
So it is your choice.
Also, if you are shopping around for the best price (these will vary somewhat from source to source, and over time), keep in mind that with OEM copies of Windows you depend on the seller, rather than Microsoft, for support. This means that your local computer shop is worth a lot more to you than any available deal on the web!